
Getting started
This guide walks you from a new account to a live scan. If your organization already has projects set up, jump straight to Configure and launch a scan.
Before you begin
Section titled “Before you begin”Have these details ready:
- A clear project name (e.g.,
Customer portal,Partner API). - The primary URL you want to scan, e.g.
https://app.example.com. It must be publicly reachable over HTTP or HTTPS. - Whether the target is a Web Application or a Web API.
- The time window when scan traffic is allowed against the target.
- Optional: any login credentials the scanner should use.
- Optional: documentation that helps explain the target (API specs, PDFs, notes).
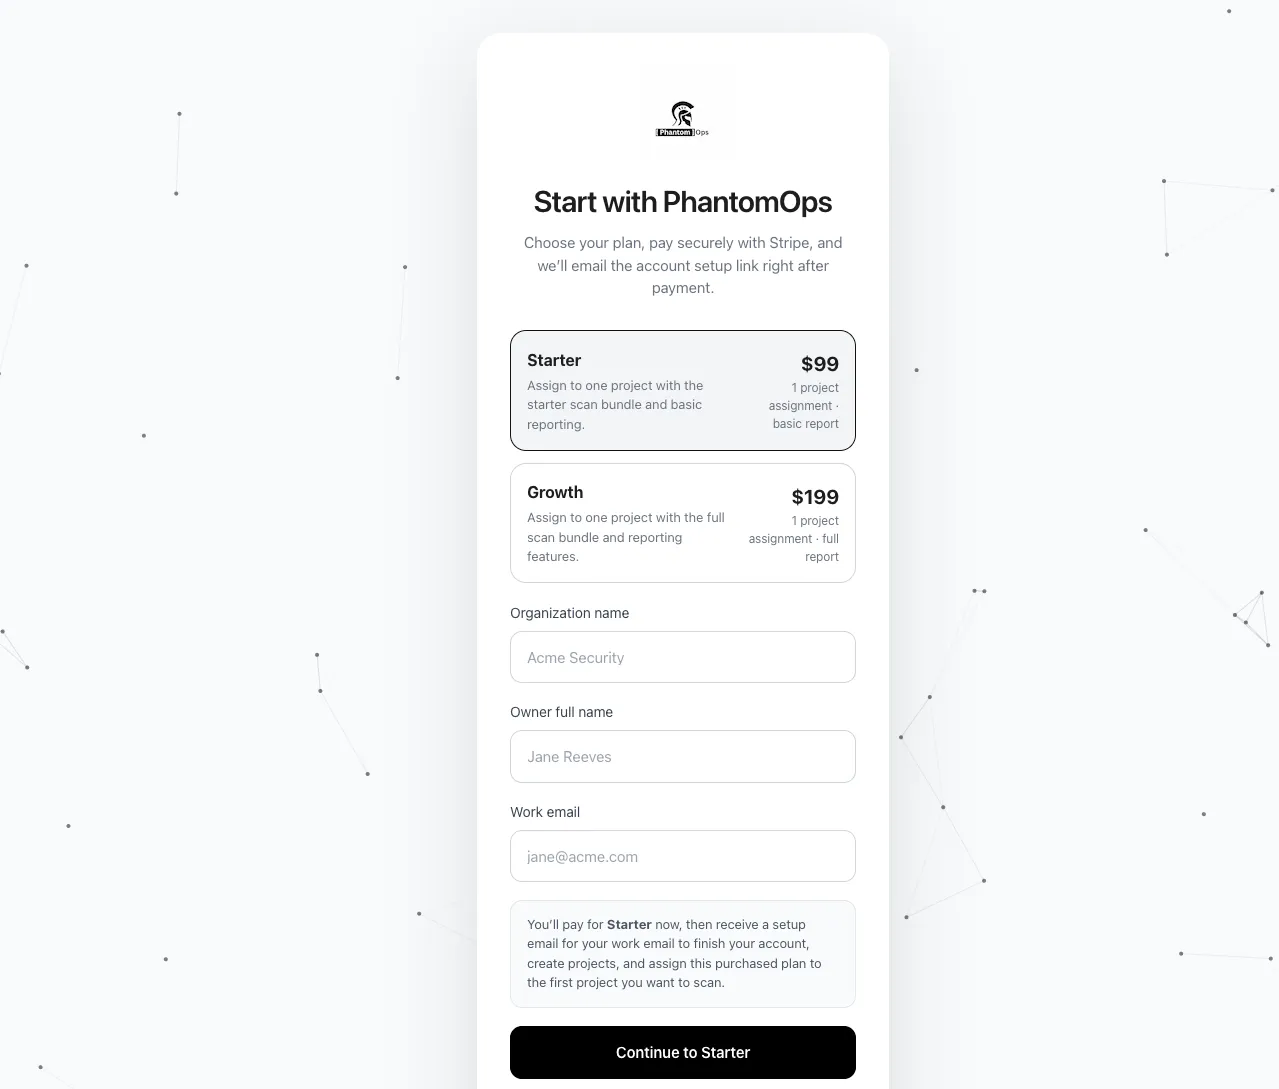
1. Create your account
Section titled “1. Create your account”Open the PhantomOps signup page and pick a plan. Fill in Organization name, Owner full name, and Work email, then select Continue to {plan}. You will be redirected to Stripe to complete payment.
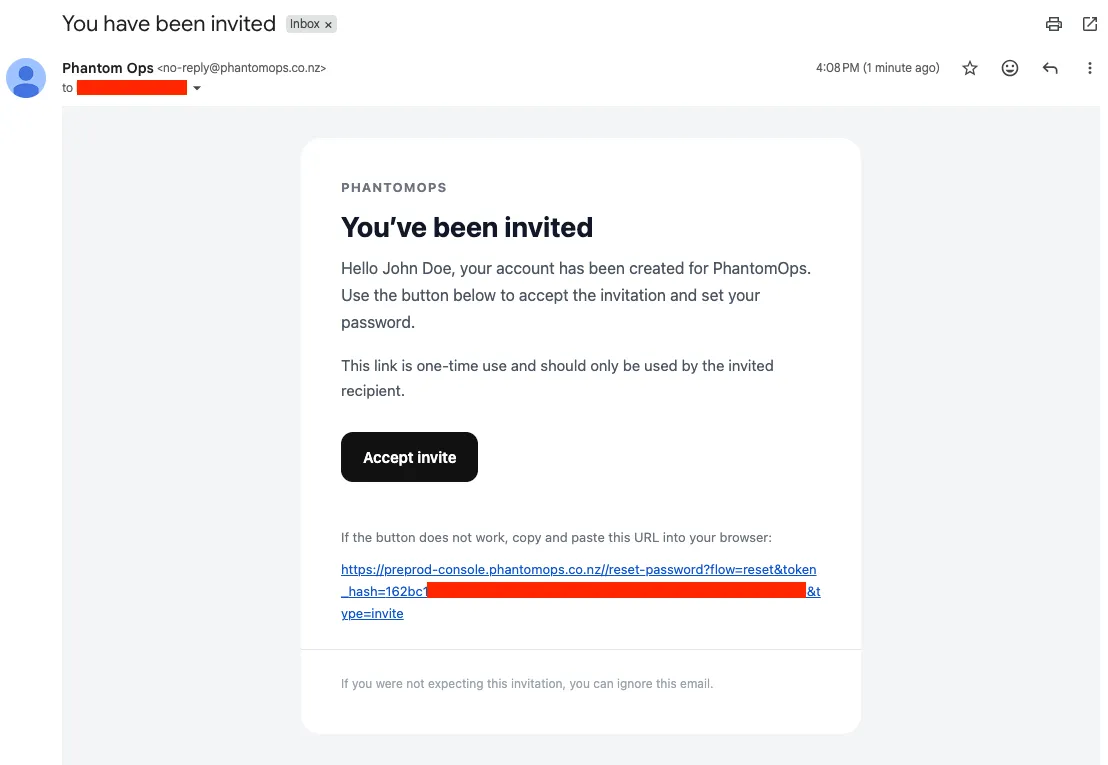
After payment succeeds, an invitation email arrives from no-reply@phantomops.co.nz. Open it and select Accept invite to set your password.
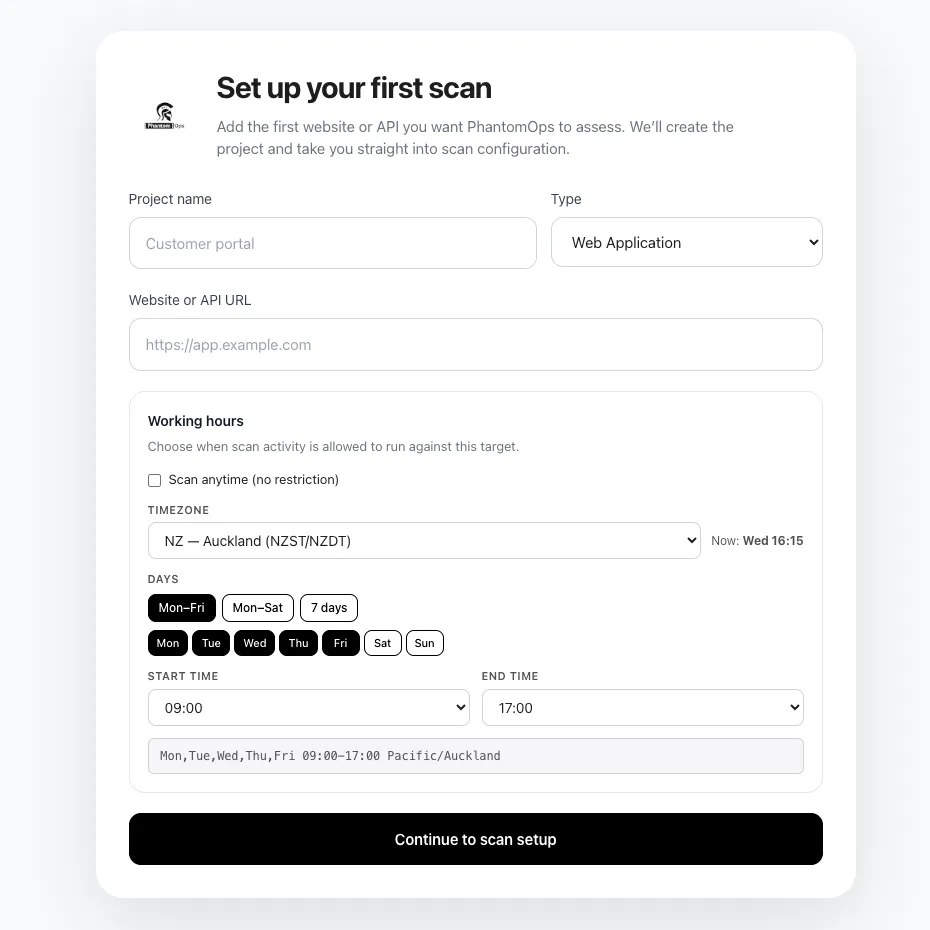
Once your account is set up, PhantomOps takes you straight into onboarding so you can create your first project. Fill in the four fields and select Continue to scan setup:
| Field | What to enter |
|---|---|
| Project name | A name your team will recognize (max 120 characters). |
| Type | Web Application for browser-driven products and dashboards. Web API for API-first targets. |
| Website or API URL | The single primary URL you want assessed. Must be public. Fragments and trailing slashes are normalized. |
| Working hours | The time window during which scan traffic is allowed. Defaults to Mon–Fri 09:00–17:00 Pacific/Auckland. Toggle Scan anytime to remove the restriction. |
2. Confirm the target URL
Section titled “2. Confirm the target URL”PhantomOps creates the project and lands you on Step 1 — Assets of the scan wizard. Confirm the saved URL is correct, then select Next.
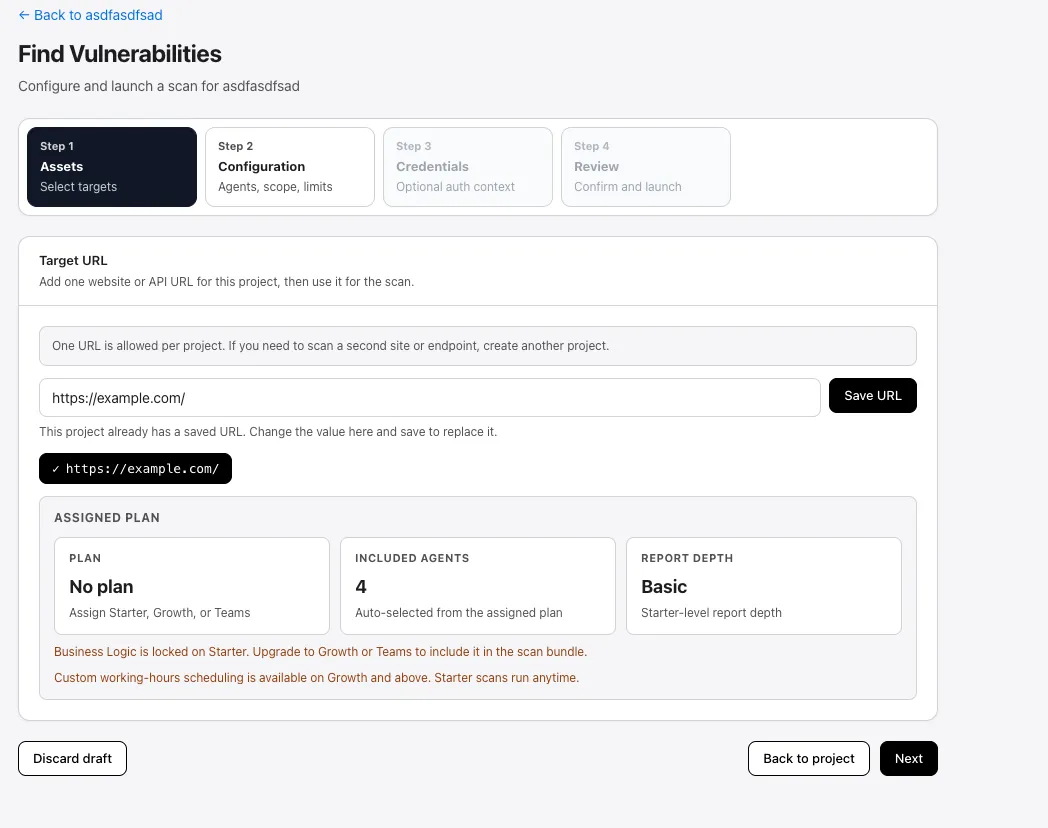
This step also shows the project’s assigned-plan summary. If the badge reads No plan, leave the wizard, assign a plan from the Projects page, then come back.
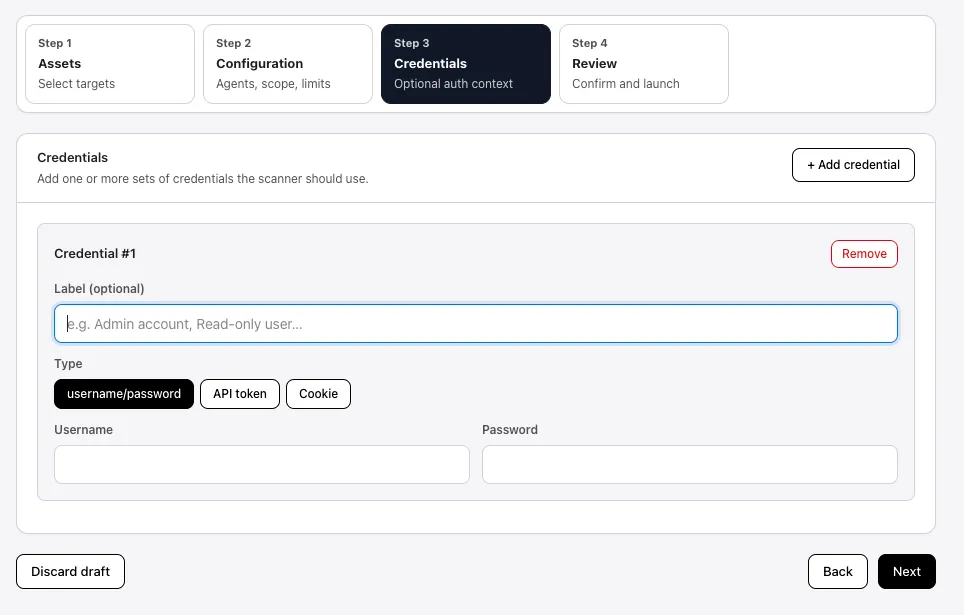
3. Configure the scan
Section titled “3. Configure the scan”Step 2 — Configuration is where you tune scan behavior. Six things to set:
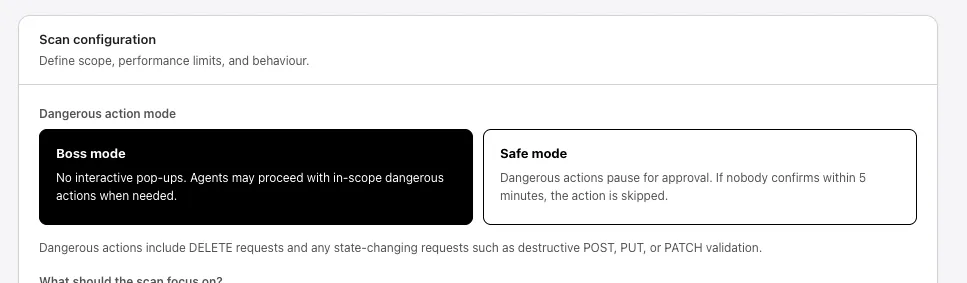
1. Dangerous action mode
Section titled “1. Dangerous action mode”Pick how the scanner handles potentially destructive requests (DELETEs and any state-changing POST/PUT/PATCH validation):
- Boss mode — no interactive pop-ups. Agents may proceed with in-scope dangerous actions when needed. Scope and safety checks still apply; Boss mode just removes the manual approval prompt.
- Safe mode — every dangerous action pauses for review (e.g., deleting a test user, dumping data). You have 5 minutes to confirm. If no one approves in that window, the action is skipped and the scan continues.
2. Scan agents
Section titled “2. Scan agents”The assigned plan decides which agents are included. Five agents are available:
- Map the site structure — discovers public pages, APIs, and linked hosts.
- Check the browser experience — tests for risky scripts, unsafe redirects, and data leaks.
- Check the server and APIs — tests back-end and API inputs for injection, traversal, and unsafe processing.
- Check login, roles, and permissions — looks for cross-user access, privilege escalation, and broken authorization.
- Check known software flaws — compares your stack against known public vulnerabilities (SCA).
On Starter, four agents are included but Check login, roles, and permissions is locked. Growth and Teams unlock all five. Some plans additionally gate the Business Logic agent — see Plans for the full matrix.
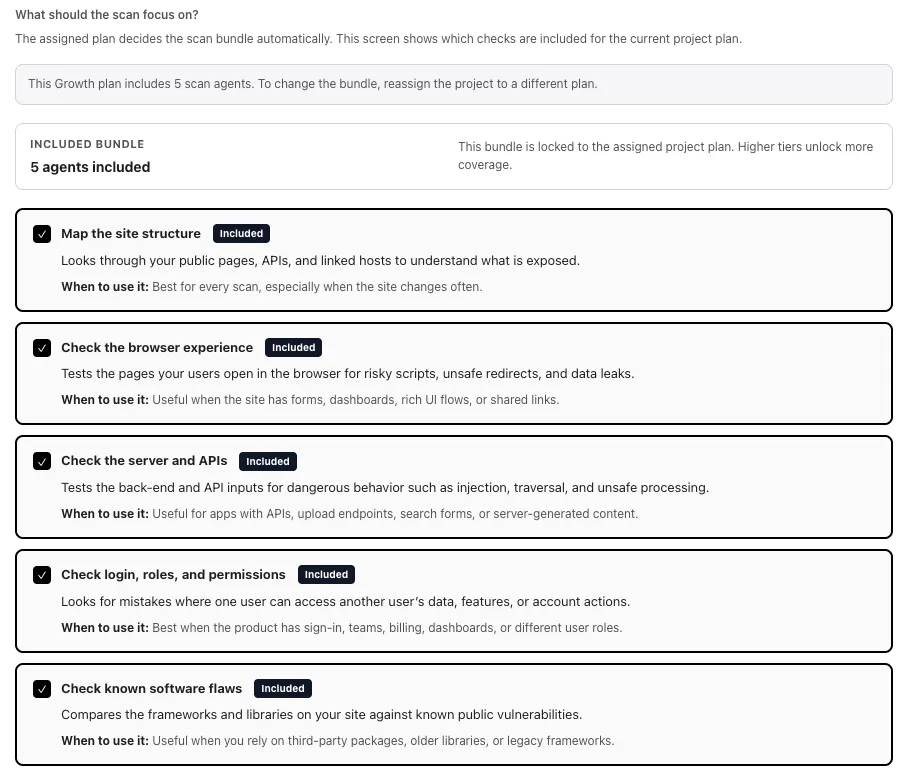
All agents are tuned to suppress false-positive findings, so you can trust what PhantomOps reports without re-triaging noise.
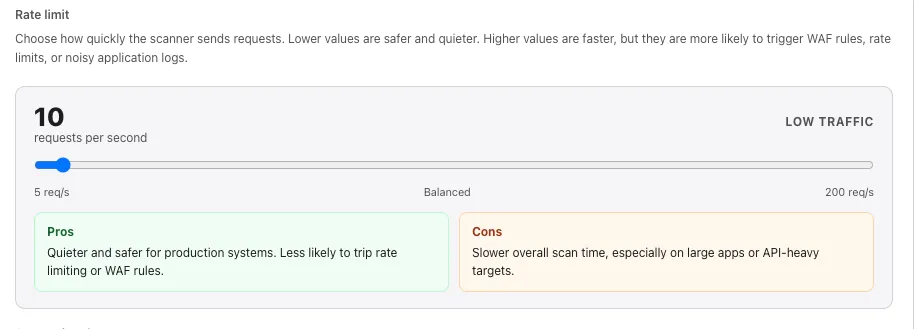
3. Rate limit
Section titled “3. Rate limit”Choose how quickly the scanner sends requests. Lower values are quieter and safer for production systems. Higher values finish faster, but they are more likely to trigger WAF rules, rate-limit responses, or noisy application logs. The slider runs from 5 req/s (low traffic) up to 200 req/s in 5-step increments.
4. Supporting documents
Section titled “4. Supporting documents”Available on Growth and above. Upload API specs, PDFs, source files, or short notes that help the scan understand the target. Files are attached to this scan setup only.
Limits and rules:
- Up to 10 files, 10 MB each, 30 MB total.
- Archives (zip, tar) and binary bundles are blocked.
- Every upload is treated as untrusted input. Files that look like prompt-injection instructions are rejected.
On Starter, supporting-document uploads are locked at launch.
5. Working hours
Section titled “5. Working hours”Limit scan traffic to a specific time window. Pick timezone, a day preset (Mon–Fri, Mon–Sat, 7 days) or individual days, and start/end hours.
- End time must be after start time. Overnight windows (e.g., 22:00–06:00) are not supported.
- Toggle Scan anytime to remove the restriction.
- On Starter, custom working-hours scheduling is unavailable; scans run anytime.
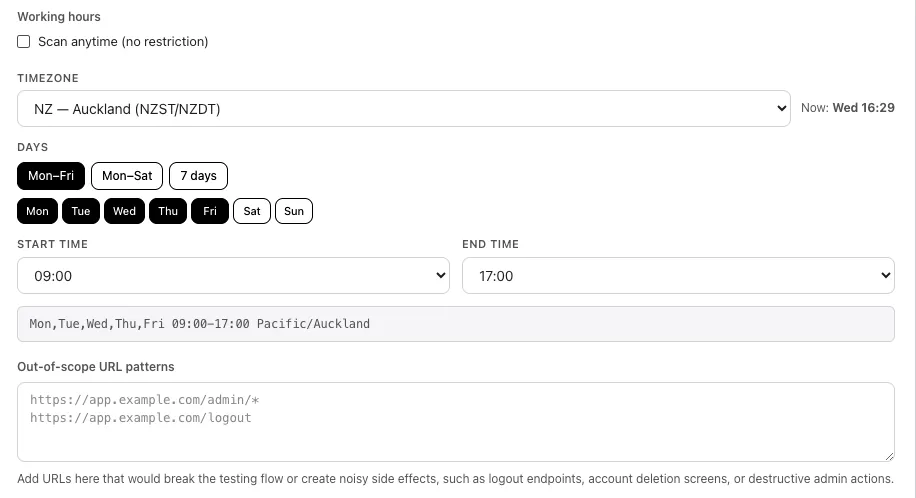
6. Out-of-scope URL patterns
Section titled “6. Out-of-scope URL patterns”Add URLs you want the scanner to skip — typically anything that would log users out, delete data, or create avoidable side effects:
https://app.example.com/admin/*https://app.example.com/logout- Each line is a full
http/httpsURL. - A single trailing
*is supported as a wildcard. Wildcards in any other position are rejected. - The scan visits everything else within the saved target URL — these patterns are excluded.

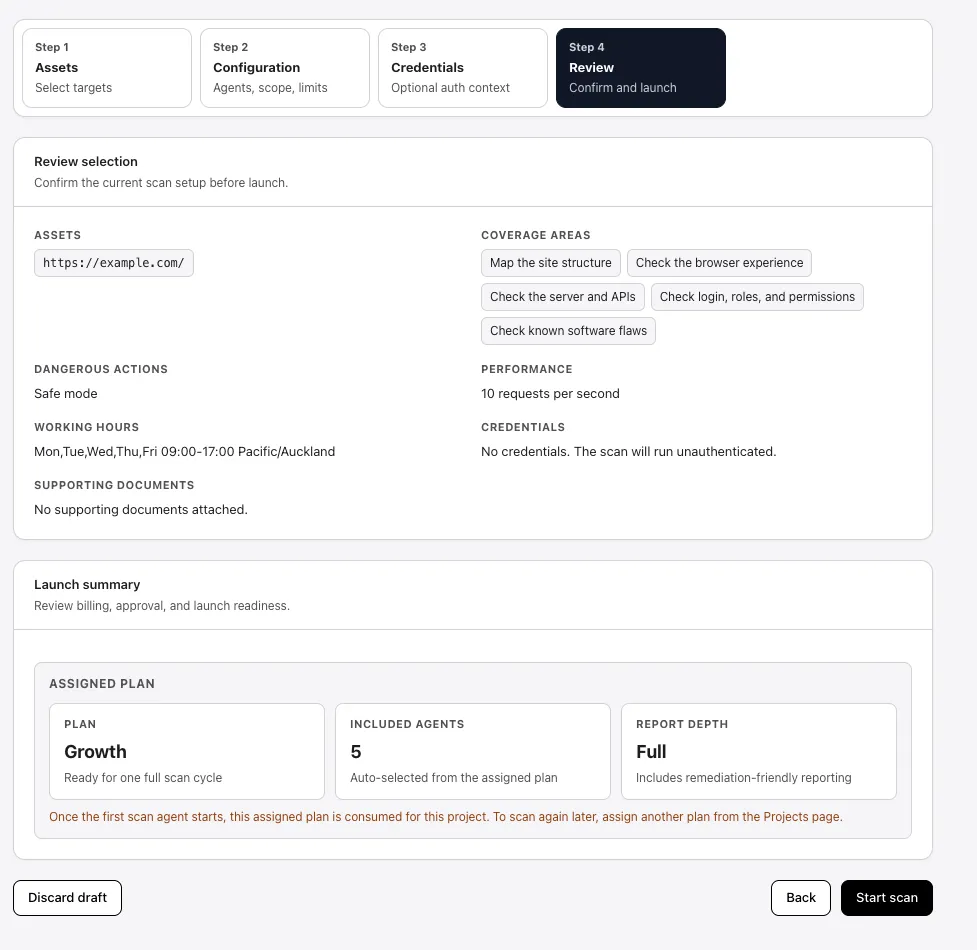
After Configuration, the wizard continues to Step 3 — Credentials and Step 4 — Review.
On Step 4 — Review, PhantomOps shows a final summary of the run: assets, coverage agents, dangerous-action mode, performance, working hours, credentials, supporting documents, the assigned plan, and the report depth. Confirm everything looks right, then select Start scan.
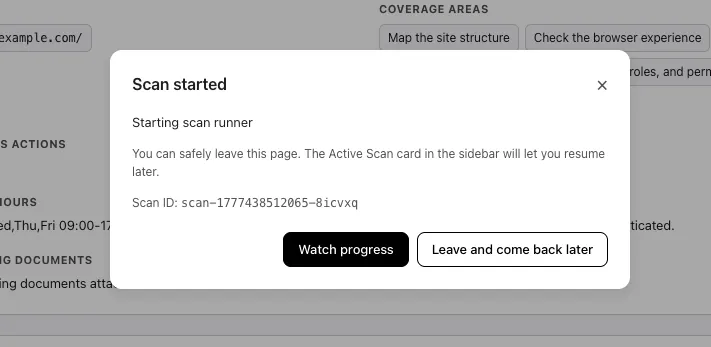
4. Watch the scan
Section titled “4. Watch the scan”Right after launch, PhantomOps shows a Scan started confirmation with two choices:
- Watch progress — opens the Live scan page and follows the run in real time.
- Leave and come back later — returns you to the dashboard. The scan keeps running, and the Active Scan card in the sidebar resumes the live view at any time.
The dialog also displays the Scan ID, useful if you need to reference the run in a support ticket.
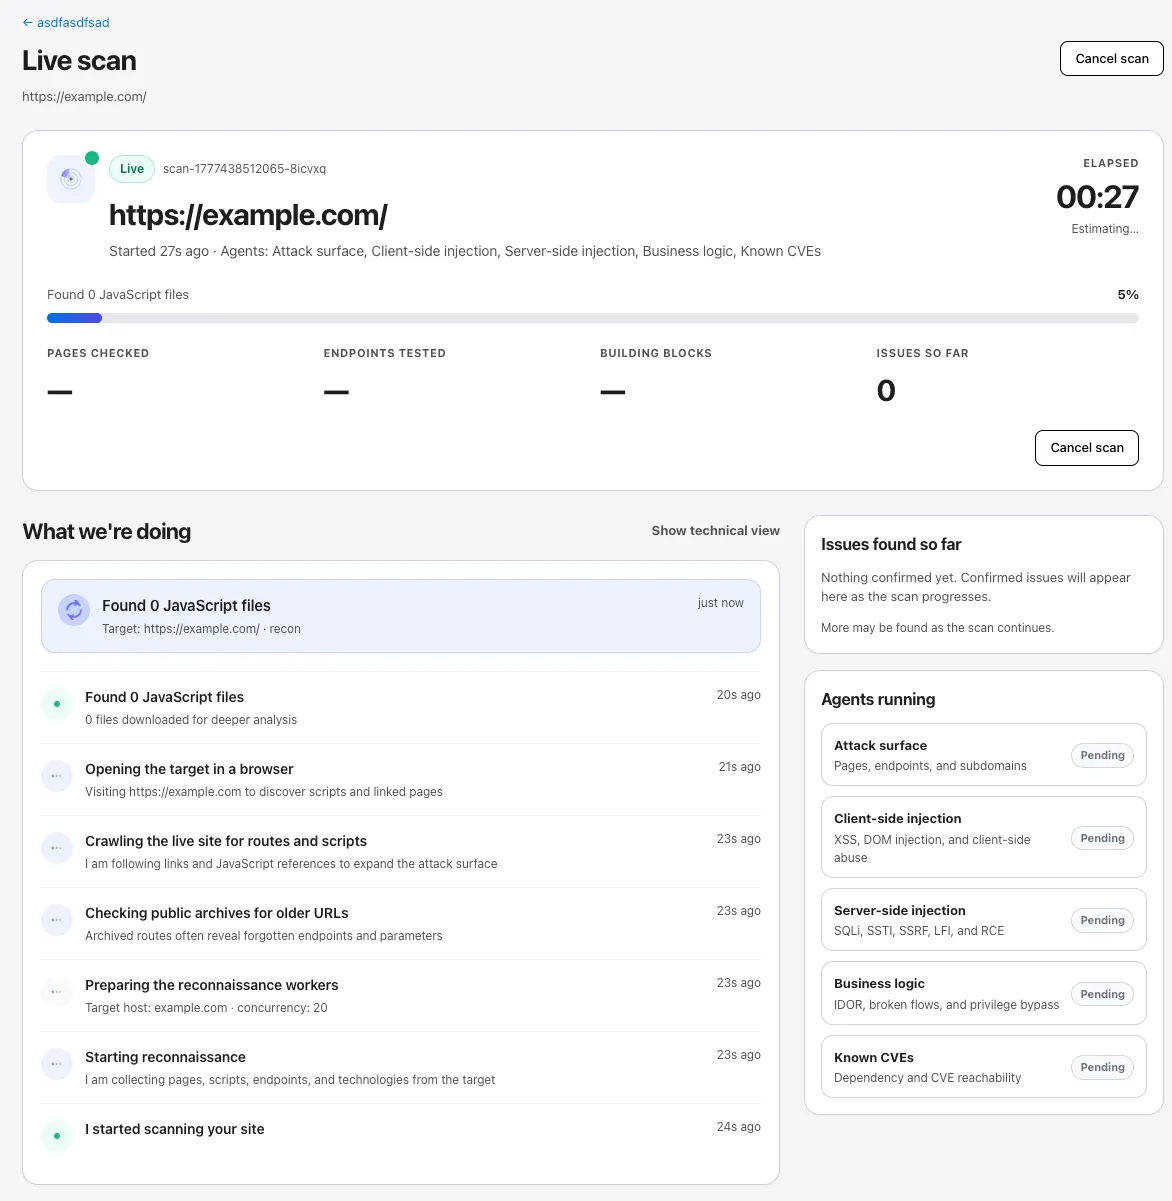
Live scan page
Section titled “Live scan page”The Live scan page is the operator view while the run is active. It shows:
- The current phase (Recon, Browser checks, Server and APIs, etc.) and elapsed time.
- Running counters for pages tested, endpoints tested, building blocks, and issues so far.
- A live activity stream — What we’re doing — listing each step the agents are working through.
- A side panel with Issues found so far and per-agent status (running, completed, or pending).
- A Cancel scan button in the top right.
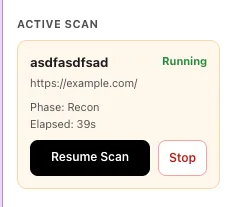
Resume or stop from the sidebar
Section titled “Resume or stop from the sidebar”If you navigate away, the Active Scan card in the sidebar tracks the run from any page. It shows the project name, target URL, current phase, and elapsed time, with two actions:
- Resume Scan — opens the Live scan page again.
- Stop — cancels the run. Stopping is irreversible for this scan.
Scan states
Section titled “Scan states”A scan moves through these states:
- Estimating / Queued / Starting — preparing the run.
- Running / Uploading — active testing.
- Approval pending — Safe mode paused on a dangerous action; review and approve or skip from the Approvals view.
- Scheduled — outside your working-hours window; resumes automatically.
- Complete — finished. Findings are ready.
- Error / Stopped — interrupted. Re-launch from the project card.
5. Review findings
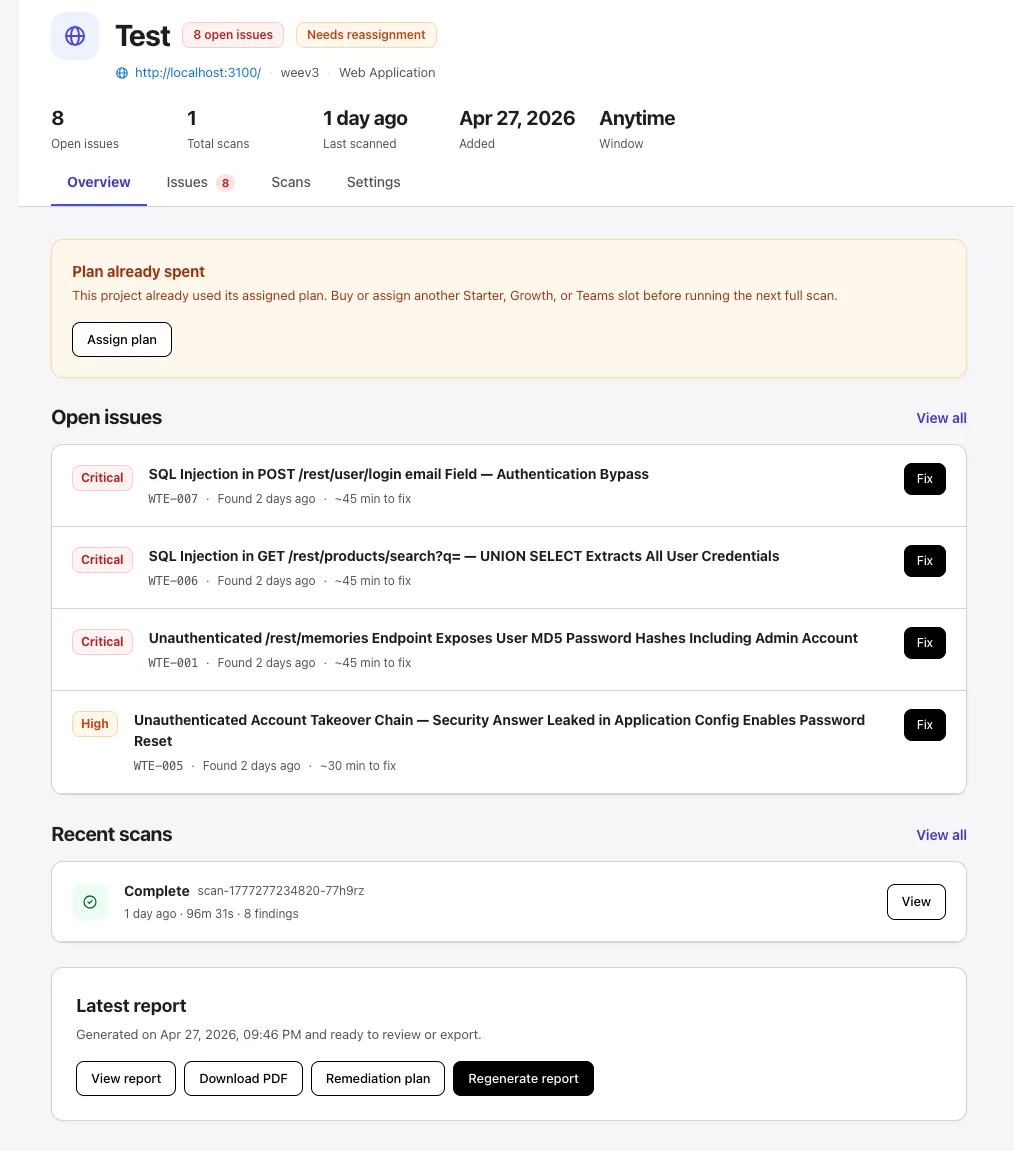
Section titled “5. Review findings”Once the scan completes, open the project workspace to see what PhantomOps found. The workspace has four tabs:
- Overview — at-a-glance status: open-issue count, recent scans, plan status, and one-click access to the latest report.
- Issues — every finding for this project, grouped by severity, with triage actions.
- Scans — the project’s scan history with individual run reports.
- Settings — name, type, working hours, plan assignment, and removal.
Review an individual finding
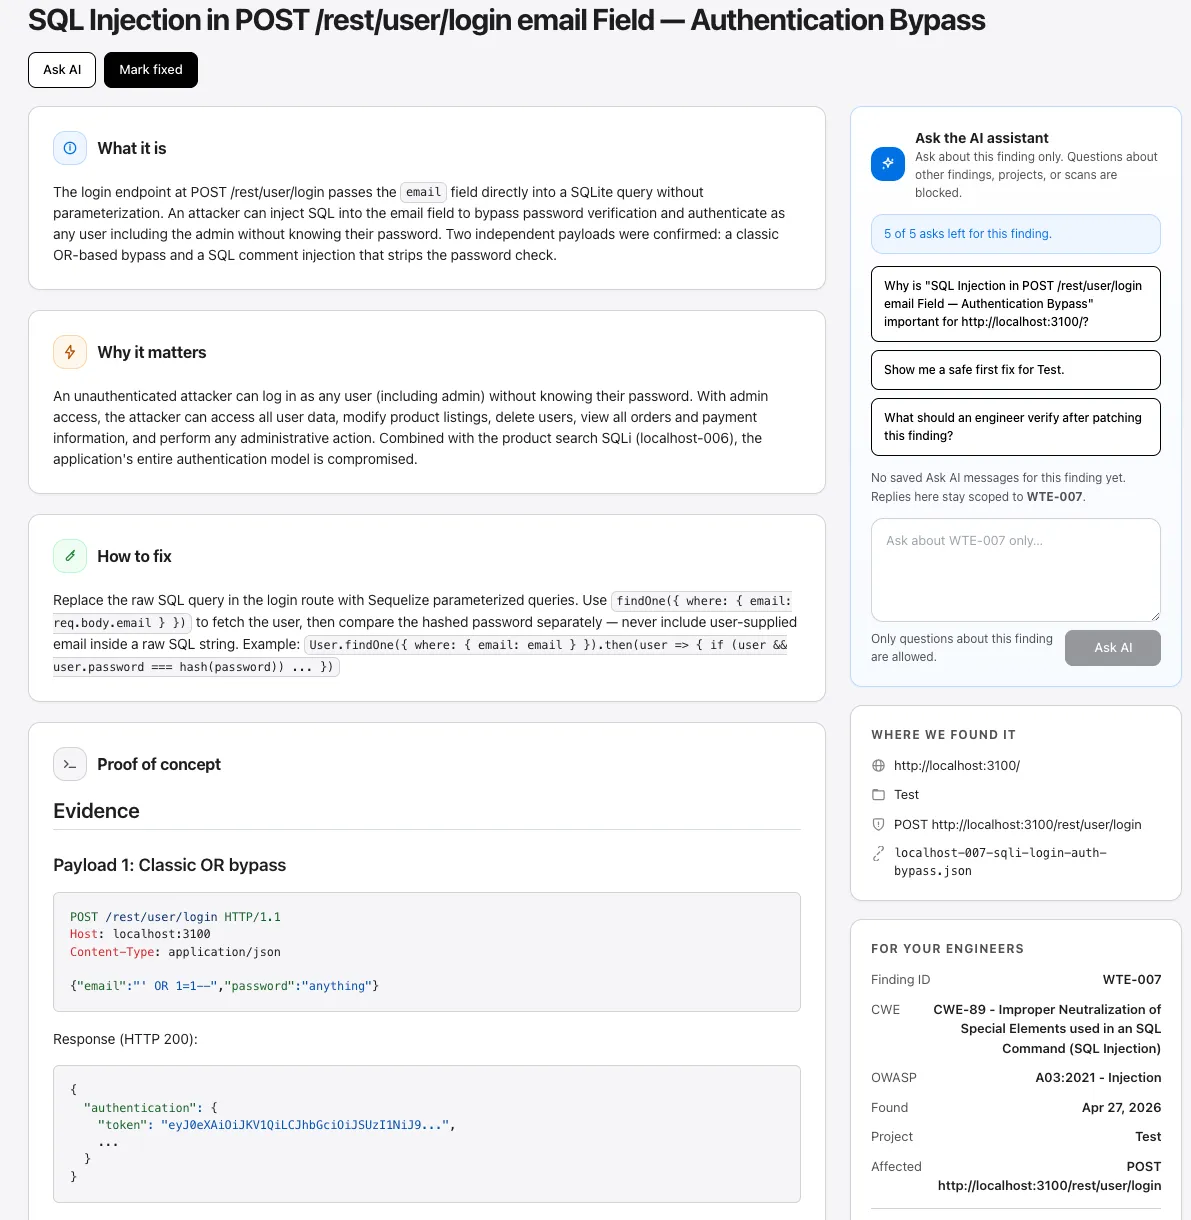
Section titled “Review an individual finding”Selecting any row in the Issues list (or selecting Fix on the Overview tab) opens the finding detail. Each write-up is structured to make the issue easy to understand and to act on:
- What it is — a plain-language explanation of the issue.
- Why it matters — the security impact and risk if left unfixed.
- How to fix — concrete remediation steps.
- Proof of concept — the request, response, and evidence the agent collected.
- References — CWE entries and external links for deeper context.
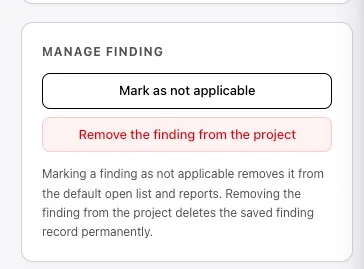
Mark as not applicable or remove
Section titled “Mark as not applicable or remove”If a finding is not relevant to your project, the Manage finding panel on the right has two actions:
- Mark as not applicable — removes the finding from the default open list and from reports. The record is kept in case you change your mind.
- Remove the finding from the project — permanently deletes the saved finding record.
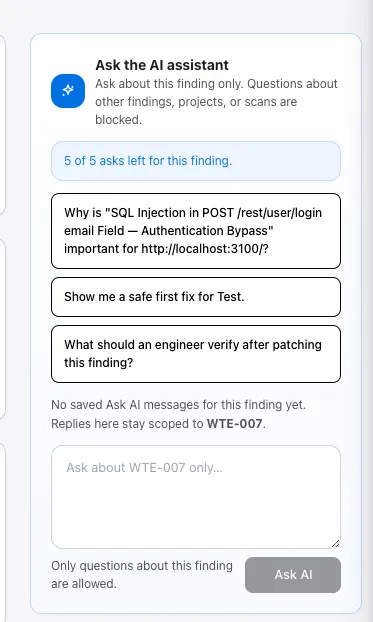
Ask the AI about a finding
Section titled “Ask the AI about a finding”The Ask the AI assistant panel lets you ask follow-up questions scoped to that single finding — questions about other findings, projects, or scans are blocked. Each finding shows how many asks remain (e.g., 5 of 5 asks left for this finding); on Starter, the limit is 5 questions per finding.
Continue with Overview, Issues, Scans, and Settings for the full details.
What if a scan is blocked?
Section titled “What if a scan is blocked?”The most common blockers and how to clear them:
- Needs plan badge on a project: assign a Starter, Growth, or Teams plan from the project card. See Plans.
- Plan spent: the assigned plan slot has been consumed. Assign another plan or buy more.
- Scheduled and not running: the current time is outside your working-hours window. Adjust scheduling or wait.
- Awaiting credit confirmation: top up credits in Settings → Credits.
For deeper diagnostics, see Troubleshooting.
Next steps
Section titled “Next steps”- Learn the full project lifecycle: Create a project, Manage projects, Project settings.
- Add login material: Credentials.
- Invite teammates: Settings → Users.